Full Of Life, Vegan Connections
  • Home
    • Plant-Based or Vegan?
  • Recipes
  • Inspiration
    • Blog
  • In the Spotlight
  • About Me
    • Contact Me

Recipes

Straight to your Inbox

Subscribe

Peanut Butter Coconut Squares

10/29/2014

0 Comments

 
Picture
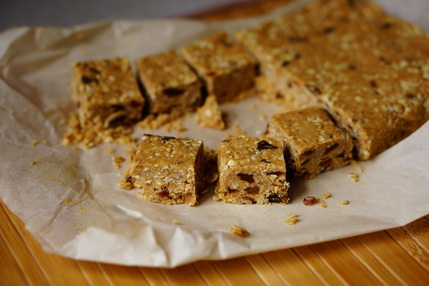
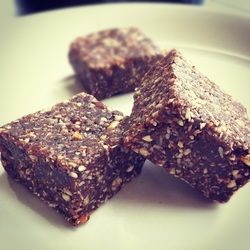
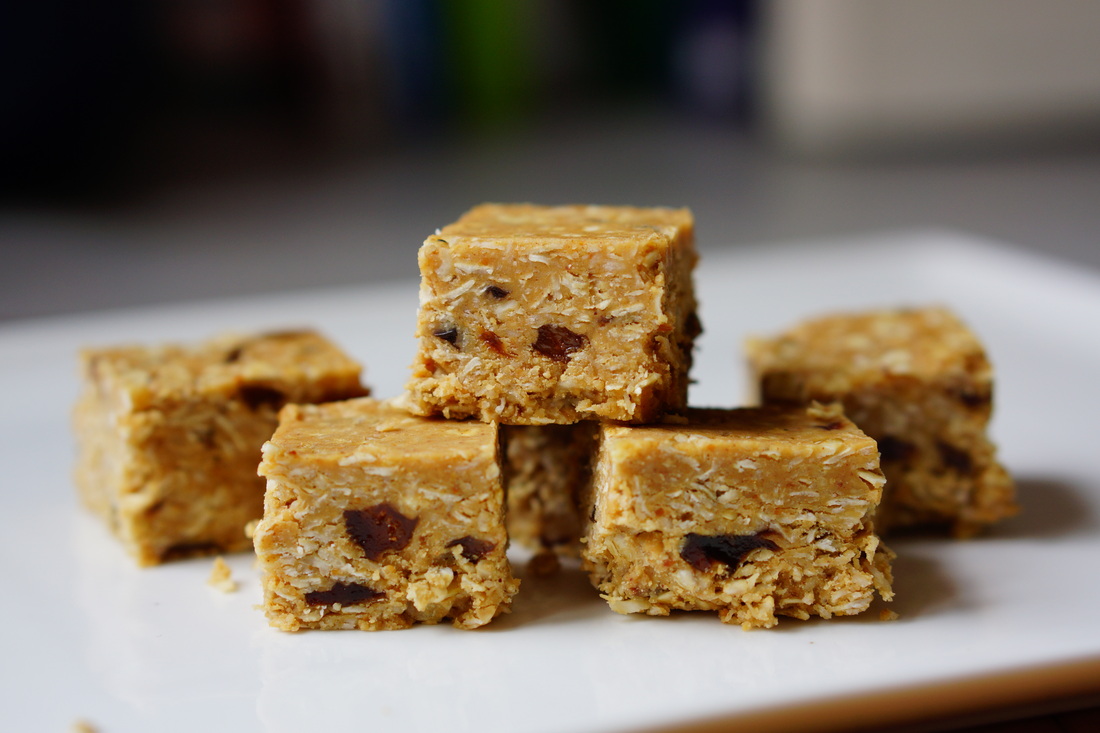
These no-back squares are a super healthy version of the tradition peanut butter balls with butter and icing sugar. With only 3 tbsp of maple syrup, and the rest of all natural whole food ingredients, these will satisfy your cravings for a decedent snack or dessert, as well as your goal of eating high nutrient foods.

No Bake Peanut Butter Coconut Squares 
(makes 20-24 squares)

1 cup all natural peanut butter, at room temperature
3 tbsp pure maple syrup
2 tbsp melted virgin coconut oil
1/4 tsp salt 
1 1/2 cup quick oats
1 cup unsweetened dried shredded coconut
1/2 cup raisins, chopped

  1. In a large bowl, stir together peanut butter, maple syrup, coconut oil and salt
  2. Fold in coconut, oats and raisins
  3. Loosely lay parchment paper overlapping the edges in a square baking pan
  4. Firmly press mixture into one half of a square baking pan, pushing down and into the sides,
    to form a brick about 3/4 inch thick. Use parchment paper to press mixture down, or
    fingertips
  5. Allow to cool for 20 min in the fridge
  6. Cut into squares and store in the fridge

*Note, the square become less oily after one day as the oats absorb the oil. It's best to cut them early, then serve them the next day straight from the fridge or at room temperature. 


Picture
0 Comments

Coconut Energy Balls

7/3/2013

2 Comments

 
Picture
'Energy balls' are always delicious and nutritious. They're so simple to make and play around with by adding different superfoods such as dried fruit, nuts, seeds, goji berries, chia, and so on. Though they're a nice treat at any time, there is one time in particular where energy balls are a must for me: while hiking. I love having a high-nutrient/energy fuel on hand that leaves no mess and is super easy to pack, grab and eat.

Unfortunately, being 9 months pregnant is limiting my hiking adventures. But that's not to say it's limiting others'. My boyfriend and his best friend, visiting all the way from Germany, are soon embarking on a week-long camping/hiking/road trip through Nova Scotia and Cape Breton. (Yes, I'm jealous.) To help them on their journey, I'm providing a few treats- Coconut Energy Balls, to start. 

Coconut Energy Balls
(makes  16 large balls)

1 cup (packed) chopped and pitted dates (I used Honey Dates which are easiest to find at my grocery store)
1 cup whole, unroasted almonds
1/2 cup cashews (mine were roasted and salted but unroasted/salted are great too)
1 cup unsweetened, dried coconut
1/2 tsp each vanilla and almond extract (or 1 tsp vanilla extract if you don't use almond)
1/4 tsp or 1/2 tsp salt

In a food processor blend up nuts until they are in fine pieces.
Add dates, coconut, extracts and salt and continue blending until the mixture falls away from the walls of the food processor. Check to see if it's ready by trying to form a ball with the mixture. If it's too dry it will crumble, but as the nuts release more oil, it will stick together. 

Transfer mixture to a large bowl and begin forming balls by squeezing mixture in the palm of your hand and rolling, or shaping balls. 

Picture
2 Comments

Coconut-Peanut Butter Blondies

11/19/2012

0 Comments

 
Picture
These squares of goodness were a happy accident. I pulled out all the ingredients in my cupboards that could aid to the making of some sort of cookie, and I ended up with a sort of brownie.. or, blondie in this case.

This recipe isn't yet perfect, even though the final product was, but that's what you get for baking free hand! I'll share what I've got in mostly estimated measurements but feel free to tweak what I've done and let me know if you hit on any good adjustments. If so, I'd love to hear about it below in the comment section! 

So, here she is! Coconut-Peanut Butter Blondies. 


Pre-heat your oven to 350F.
I used a non-stick 9x9 baking dish which didn't need to be greased.

1. In a small bowl, mix 3 tbsp ground flax seeds with 12 tbsp water.  Put aside for a few minutes to allow the flax to absorb some of the water.

2. In a big bowl mix together the following ingredients with a fork until uniform:
1/2 C room temperature (liquid) virgin coconut oil
1/2 C natural chunky peanut butter
3/4 C brown sugar
3 tbsp maple syrup
2 tbsp ground flax seeds with 4 tbsp water (mix together in a bowl first and allow to sit for a few minutes)
1 tsp vanilla
1/2 tsp salt 

3. In another bowl, mix the following dry ingredients together.
1/2 tsp baking soda
1/2 tsp baking powder
1/2 C coconut flour (Bob's Red Mill)
1/2 C quinoa flour (or other)

4. Mix dry into wet, combine, pour in baking dish and cook for 16 minutes.
*Mixture should be a little thick and not quite 'pourable'. Feel free to use your fingers to smooth it out into the corners of the pan.

5. Mix together the following ingredients for the topping.
1/3 C natural chunky peanut butter
1/3 C raw, unsweetened coconut flakes 
1/3 C icing sugar
1/4 tsp salt

6. After 16 minutes cooking time, take out the blondies from the oven and add crumble topping. Pat topping down into blondies and return to oven to cook for 3 more minutes.

7. Allow blondies to cool completely before cutting and serving. Before they are cooled they'll crumble. Store in the fridge. 

Enjoy! 


0 Comments

Chocolate Mousse TorteĀ 

6/7/2012

6 Comments

 
Picture
You're in for a big treat!  

I just made this for a birthday dessert. It was my first time coming up with a crust like this and I'd claim success.  :) 

Almond Pretzel Crust
(serves 8-10)

1 cup dates
1/2 cup raw almonds
1 cup thin pretzel sticks
1 tsp coconut oil 

Add dates and almonds to a food processor and process until somewhat fine. Then add pretzels and coconut oil and process until crumbly. The mixture should stick together when you pinch it.

Push crust into desired dish (small torte or pie pan, or individual pie shaped dishes as pictured) and desired thickness- not too thin. When finished, place in the fridge while you make the filling. 

Chocolate Mousse Filling
(adapted from Post Punk Kitchen)

1 package extra firm silken tofu (I use Mori-Nu, a popular non GMO brand)
1 standard package semi-sweet (vegan) chocolate chips
3 tbsp pure maple syrup
1 tsp vanilla extract 

In a blender puree tofu, maple syrup and vanilla. 
Next, over a double boiler, melt chocolate chips
Add chocolate to the tofu mixture in the blender. 
Blend together until smooth and creamy. 
With a spatula, pour the chocolate-tofu mixture into the crust and return to the fridge for 3-12 hours, covered. 

Let me know if you try it out and how it works by leaving a comment!
Enjoy! 

Picture
6 Comments

Vanilla Cake with Chocolate Mousse Icing

5/14/2012

0 Comments

 
Picture
I've done it again. Another friend's birthday, another vegan birthday cake made. This time, veering away from the double chocolate cakes I've been making, I went with something a little more spring-ish - vanilla, with chocolate mousse and raspberries. Beautiful. 

The cake recipe was originally taken from CDKitchen which has many variation on the same basic cake recipe. Here you can find vanilla, chocolate, spice cake, banana and more. The mousse was originally from Isa Chandra's Post Punk Kitchen site for a chocolate cupcake mousse. With just a couple modifications.. voila! My cake creation. :)


My system for making these cakes are to 1) prepare the chocolate mousse which has to be left to become firm in the fridge for a few hours. 2) prepare the cake and bake it. 3) let the cakes cool. 4) assemble cake and mousse. 5) return to fridge, covered, until ready to eat. 

Vanilla Cake
Preheat the oven to 350 F. Lightly grease two 9" round cake pans. In a large bowl, mix together the dry ingredients and in a smaller bowl mix the liquid. Combine the wet ingredients into the dry, quickly mix with a wooden spoon or whisk, then divide mixture equally between the two pans. Bake for 35 minutes or until a toothpick come out of the middle dry. 

Dry Mixture:
3 cups flour
2 cups sugar
2 tsp baking soda
1 tsp salt 

Wet Mixture:
2 cups cold water (minus 3 Tbsp)
1/2 cup vegetable oil
2 Tbsp (rice, white, or apple cider) vinegar 
2 tsp vanilla extract 

Chocolate Mousse
Into a blender, add- 
1 package of extra firm silken tofu (usually found in a tetra-pack box, not refrigerated)
3 tbsp almond or soy milk
3 tbsp maple syrup 
1 tsp vanilla  

Blend until smooth. 
Meanwhile, over a double boiler, add one regular sized package of dark chocolate chips and melt. 
With a spatula, scrape the chocolate into the blender, and blend the tofu and chocolate together until silky and combined. You may need to scrape down the sides or add another tbsp of almond milk to get it to blend together well. 

Pour mixture into a container, covered, and put into the fridge to become firm for 2-3 hours. 

When the cakes are cooled, and the mousse is firm, assemble cake however you like! Have fun and enjoy! 

*Here's a picture of the last double chocolate cake I made for another friend's birthday. Yum! 

Picture
0 Comments

Maple Cashew Cream

5/1/2012

0 Comments

 
Picture
Are you afraid of fat?? You should be! Unless you're talking about whole foods, plant based fats of course. ;)

Although fat is a high calorie nutrient, it is an extremely important one as a nutrient. The kind of fats you should be afraid of are ones that are nutritionally void, clog your arteries and lead to weight gain; those found in fast food, deep fried, and highly processed food, or animal products. Nuts, avocados and seeds are staples in my diet and provide me with healthy fats that keep me full, lower cholesterol, control my weight and balance my moods.  So am I afraid of fat? Not at all! 

I often prepare cashew based creams and sauces and this maple cashew cream is one that will add a satisfying sweetness on top of berries, over granola, to have on a dessert, or even on top of peanut butter, as pictured. 

Maple Cashew Cream 

1 cup blanched cashews (Soak them in water for 2 hours prior to using them in this recipe. This will soften them, and activate living enzymes and nutrients so they are easier to digest and offer more nutrition.)
1 or 2 Tbsp pure maple syrup
1/4 tsp vanilla extract
1/3 cup non dairy milk (more or less, just enough to get your blender to pureed the nuts)

Add soaked and drained cashews to a high speed blender along with maple syrup, vanilla and non dairy milk. Blend until silky smooth. You can store this in the fridge for a couple of weeks. 

0 Comments

Vegan Chocolate Cake

4/7/2012

3 Comments

 
Picture
How does everyone like their chocolate cake? Moist? Chocolatey? Not too sweet? With a fudge layer? And almonds? I thought so.

Here's a recipe for basic chocolate cake. It's so super easy that I've memorized it and I think you may too. I often make it a double layer cake, but I've even gone so far as making a grand 3-layer one. I caution that. ;)  

All you need here is one big bowl to mix the dry ingredients, and a smaller bowl for the wet. Combine the wet into the dry, mix, and put in a 9" (ish) cake pan. Bake at 350 for 30-35 minutes. Ta-da! 


Vegan Chocolate Cake
(Makes one cake layer- double recipe for two layers, and divide in two cake pans)


Dry: 
1 1/2 cup unbleached flour
1 cup sugar
1/4 cup coco powder
1 tsp baking soda
1 tsp salt

Wet:
1 cup cold water
1/4 cup oil 
1 tbsp white/rice/apple cider vinegar 
1 tsp almond extract 

Fudge: 
For this I've always been pretty loose and gone without a recipe. However, next time I make it I'll be sure to write out some measurements. As a fudge layer in the middle I combine dark chocolate (no milk products in it), chopped almonds, some icing sugar, a little coconut oil, a few drops of almond extract and about 1/2C well-pureed chickpeas. Melt it all over a double boiler until it's a good consistency and taste, and then spread it between cooled cake layers- about 1cm thick. 

Icing: 
(Also without a recipe- sorry!) Over a double boiler melt together dark chocolate, icing sugar, 1tsp vanilla and 1tbsp coconut oil. Add more chocolate and icing sugar until you get a good consistency. It will harden once cooled in a fridge. You could also add any left over fudge layer to the icing and make a bit of a thicker icing. Your call!

PS. Vegan chocolate cake is ALWAYS a hit. 

3 Comments

Coconut-Nut 'Brownies'

3/15/2012

2 Comments

 
Picture
These bite-sized no-bake brownies are rich in nutrients with no added sugars. The only sweetener is dates, which in my life, means that they are great for breakfast, snacks or dessert. And a bonus, I found when I ate them directly from the freezer they were somehow twice as good! 

Coconut-Nut 'Brownies'

1/2 cup raw natural almonds
1/2 cup unsalted cashews 
3/4- 1 cup pitted, chopped dates
1 cup raw, unsweetened shredded coconut
3 tbsp coco powder 
1 tbsp coconut oil (optional)
1 tsp vanilla
1/4 tsp salt

In a food processor, add the almonds and cashews and blend until finely ground. Add the dates and coconut and pulse until mixed in. Then add the remaining ingredients and blend until crumbly but not too oily. Shape by hand into balls, or press firmly into a square dish, pushing to one side (fills about half a square cake pan). Leave to set in the fridge for about half an hour. The longer they rest, the more the coconut flavour comes out. 

This snack is vegan and gluten-free.

2 Comments

    Categories 

    All
    Breakfasts
    Desserts
    Dressings Spreads And Dips
    Meals
    Powerhouse Nutrition
    Salads
    Snacks